Sunday, December 9, 2012

Step 28 - Setting Interior Doors

I use a lot of  pre-hungs, but openings with doors wider than 36" (by-pass and bi-folds) are most commonly bought and installed in the various pieces and parts that make up any door.  The door pic and added notes below come from finishcarpentryhelp.com.  This is an example of one of the great sites out there that'll walk you through the process of hanging a pre-hung through step-by-step descriptions and videos. 


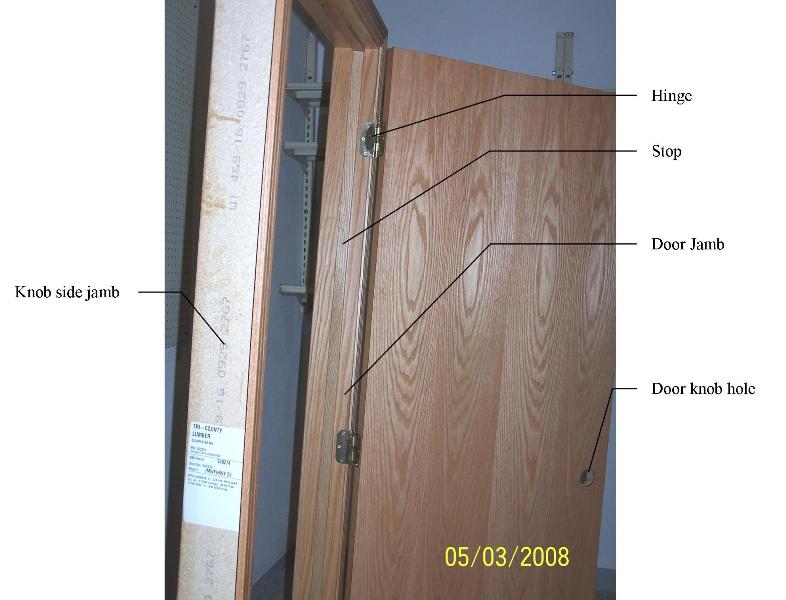
A pre-hung interior door bought at a building supply store or do-it-yourself chain will come out of the rack ready with all the parts (except the door knob). 

It's worth mentioning that these various door peices have a purpose or origination beyond how they look.  The wooden jambs frame the door and one side (see pic above) serves as the mounting point for the hinges/door.  The stops and casing are nailed to these jambs.  The stops do two things; they keep the door from swinging too far inside a room, but they're also significant because they create some privacy (visually) between rooms.  The casing is also attached to the jambs.  (Shown but not labeled in the pic above.)  It trims the door system out and makes it look complete, but the biggest purpose of casing is to conceal the gap between the walls and the jambs.    

A major feature (and easily taken-for-granted) of the pre-hung door is that the hole for the door hardware has been pre-drilled.  However, the knobs won't get popped in just yet, they're a few other things that need to be done first and I typically don't even buy them until just before I am ready to put them all in (Step 34).

When I'm rehabbing an entire house, I like to get all the doors ready and start knocking them out one after the other.  I need the same tools and supplies (i.e. - nails and shims) on each door and it's most efficient for me to go from one to the other and get in groove with the task until they're all hung.  

As I mentioned above, closet doors have most of the same pieces, but a lot of times the stops are not necessary and the closet parts need to be shopped for and purchased separately.  Bi-folds and by-pass doors are examples (as well as pocket doors.)

If you're not highly experienced in interior door work I'll encourage you to take some time to surf around and prep by spending an hour or so reading and watching an instructional video.  Don't be too surprised if they make it look easier than it ends up being, but be ready to take your time in the beginning so you can really understand what you're doing at that first one before you build on that experience with the doors that follow your initiation.  And, consider reading If Necessary, Just Slow Down.   

Thursday, November 15, 2012

Tim Tebow + Michael Vick + Denard Robinson = the NFL's Moneyball

This blog is about renovating extreme houses, but I like to listen to sports radio (see Appreciation for the Radio - Jan. 26, 2012)  while I'm working so the Tim Tebow story is once again in my head.  (See Tim Tebow Is Fascinating Us Because He's Doing the Impossible - Jan. 12, 2012.)

Some think my investments have been risky and they've tried to talk me down from the ledge.  Family, friends, and co-workers have made blatant attempts to get me headed in the other direction, to take a safer, easier course.  However, to the credit of the majority of those in my circle of influence, they've been excited for me when I've succeeded in turning the 'Pig's Ears' into silk purses.  They've been proud to tell people that I bought the worst house on the street and transformed it into the most valuable.

My wife isn't a big football fan, but she loves the Tim Tebow story.  For this reason, we talk about TT and his status with the New York Jets regularly.  Earlier this year she was following his dismissal from the Denver Broncos and wanted to know what I'd do if I was a decision maker for one of the remaining 31 NFL teams.  This question and the discussion that followed helped me realize that I am a bit of a risk taker.  I think there is some risk to bringing Tim Tebow into your club as a quarterback, but like the condemned or abandoned properties I've bought to rehab, I see a large, potential upside.  So, if I was a top shelf NFL guy, I'd pull the trigger on the Tim Tebow thing.  However, I wouldn't just go for it by plugging him into a somewhat traditional system or the often mentioned wildcat formation, I'd come at the challenge from a different angle and do something others weren't thinking about.  

When I was in High School, I was recruited to play college football.  One of my coaches suggested that I consider Denison University in Central Ohio, because they had a unique, old-school offense that had the center hiking the ball directly to a runner in the back field.  He thought this might be the school and the team for me.  Now I understand why he suggested it and I agree that the Big Red would have been a cool team to play for.

So all this wordiness get's me to the Tim Tebow Dilemma.  I like the idea of matching Tim up with a stable of other scrambling quarterbacks like himself with the throwback Denison U.-type offense.  Michael Vick is struggling in Philly so there's a potential match.  How about a team putting Vick and Tebow back there together and drafting some more college QB's that have had tremendous success, but little hope for an NFL starting spot because of their size.  For example, the University of Michigan's Denard Robinson.  He just broke Antwaan Randle El rushing mark (October) from when ARE was running and passing as the QB of the Indiana Hoosiers (before he went to the pros and played wide receiver for the Pittsburgh Steelers without a shot taking snaps under center.)  Russell Wilson has gotten off to a good start as the signal caller for the Seattle Seahawks, but the jury is still out on him.  

I'd like to see an NFL team take the approach of replacing traditional running backs with proven scrambling QB's who can play differently than the traditional pocket passers.  Change it up.  I don't think a team should put all their eggs in one basket and rest the seasons hopes on one guy who's running for his life half the game.  (If he gets hurt, you have to have someone just like him to come in and try to duplicate his style.)  I am all for some NFL team thinking outside the box and doing something different with Tim Tebow in the mix.  (Like the Oakland A's did when they lost their star players to free agency and starting playing Moneyball in 2002 ...and winning.)  Who wouldn't tune in to to see Tebow, Vick, Robinson, and three or four other players who could run and pass switching in and out, down after down, as they march the ball down the field like no other team ever has?

I think it could work  because the scrambler with the ball creates exciting opportunities to hit receivers and people would love to see it... just like friends, family, and neighbors like watching me renovate an overgrown, abandoned property that no one else wants.  Teams don't want Tebow?  Folks think Mike Vick is at the end of his career?  We'd like to see some Billy Beane of the NFL emerge and show everyone how to win in a different way...with Tebow and talented quarterbacks like him.     

Saturday, November 10, 2012

Fire #2 at The Fire House

We could call The Fire House 'The Fires House' because this project started and ended with two separate, unrelated fires. 

The Detached Garage
Before Fire #2 (and the Garage Door)
In the 1990's, a dryer fire in the laundry room quickly got out of control, ignited some charcoal lighter fluid stored in the attic over the den, and exploded into an intense house fire.  That disaster ultimately resulted in the four bedroom ranch being condemned by local building officials after it had been vacant for years.  I agreed to buy The Fire House in 1999 and closed on the property in 2000.   The renovation took twelve months. 

Fire #2 happened in 2002.  I was visiting family in the Midwest when I got the news.  This was just ten years ago, but times were a little different.  We didn't all have cell phones with numbers programmed into them like we do now.  A neighbor had to find someone who had a number for my family up North.  Eventually, after the message bounced between a few people, my parents heard the news, got a hold of me, and said, "One of your buildings burned down." That was all they knew, so that was the message I got.  Yikes!  At that time, I only owned three buildings; The Fire House , The Cottage, and The Detached Garage at The Fire House.  The Cottage was still being renovated, but TFH w/ it's DG were finished and this property was on the market to be sold.   

Before my thoughts raced too far ahead, I made some calls back to South Carolina and confirmed that the DG was the one lost.  I felt some relief since (of the three) it was the least significant and the easiest to replace.  When reality set in, I had seven hundred miles to drive and think about the loss of my garage (while I tried to do an accounting in my head of the things I had in the DG versus what was in the houses).  When I turned the corner to see my property, I was surprised by the extent of the fire.  I had expected to see some evidence of the original outbuilding, but it was gone.  It was a small black pile of charred remains.  There was hardly anything left.  It made me think of that scene from the movie Independence Day when the aliens obliterate The White House.  It was like those same space guys flew over my building and fired away.  Crazy. 

My detached garage was gone.   
 
The Detached Garage after the fire.

This is the grand old tree I lost.  It was struck by lightening during a storm in the middle of the night.  We believe that the strike and the metal roof on the DG sparked the fire.  I had trim and left over paint from The Fire House renovation stored in the DG and this likely helped the fire grow quickly.  The firemen thought the rain on the outside allowed for the fire to build and gain strength on the inside.  I had a lawnmower and some gas and wood stored inside and all this caught fire and burned up.   

Tuesday, November 6, 2012

The Detached Garage at The Fire House

The Carport/Storage Building at The Fire House
Having extra space under roof in the form of a garage, carport, barn, basement, or storage building is ideal and it's even more significant on a house being renovated because of the need for space for storing or using your tools, materials, &/or equipment.  

The Fire House (Before) had originally been a 1100 square foot, three bedroom, one bath ranch.  Previous owners had transformed it into 1800 sf when they added a master suite on the back and transformed the attached one car garage into extra living space. 
  
Before.  The first pic. of the Carport/Stor.Bldg.
Not much to look at, but something I was glad to have.
When I took ownership there was a structure in the back that was a carport with a storage area.  This detached building had room to park one vehicle and an enclosed area perfect for a mower, lawn tools, yard games/toys, stuff for the beach, etc...the sort of things people pack into a garage.  It was valuable space and I was thankful to have it. 

When I finished the renovation of The Fire House (After), I decided to make some adjustments and turned the carport/storage building into a two car garage.  I framed up the walls and the opening for a large garage door then salvaged siding from the storage area.  (I made the original siding work without buying more because vinyl fades a little over time and I wanted everything to match.  Reworking what I had was a little tricky, but it was possible and I was glad to be able to make it work.) 

Once the walls were framed up, I started to prep for the 350 square foot concrete slab.  (This is where I was on the morning of Sept. 11, 2001.)  

I like finishing concrete.  I learned to do this type of work during my summer breaks from college when I worked construction building glass and steel water tanks throughout the Mid-Atlantic States (Penn., WV, Maryland, Va., Ohio).  Finishing the concrete on the DG was fun, but on that day I decided that finishing 350 sq.ft./6 cubic yards by myself is my limit.  It turned out well, but that much solo wore me out and it almost got away from me.  If there's one thing you don't want to get away from you, it's concrete.  Once it's set that's it.  Fortunately, I kept control and things turned out just as I had planned...until Mother Nature had her say and my detached garage burned back down to my pretty slab of concrete.  
   
After. 
A few months later, the oak behind it got struck by lightening. 
It burned down before I got a picture with the 7' x 16' garage door.

Saturday, November 3, 2012

After Hurricane Sandy, Rebuilders Take Notice

I have thoughts regarding Hurricane Sandy and the rebuilding efforts that were seemingly underway before the storm had run its course.
I love building and rebuilding, but folks need to keep some things in mind before they head down the road of replacing what was lost and I'm talking to local leaders and taxpayers as well as home owners or potential rehabbers.
It will cost more in every way to replace what was destroyed by the storm.  I’m not merely talking about inflation and the fact that a 2x4x8 bought in 2012 will be more than one purchased decades ago, I’m speaking of building standards.  Hurricanes have taught us a great deal about the power of these storms and with the awareness that they seem to be getting more severe, those standards are only going to become more stringent.  And, stricter building codes will mean higher costs.  Someone rebuilding or extensively renovating after Hurricane Sandy will need to be mindful of this from the start.
Hurricane Clip
When we renovate a home we leave it better than when it was built 30, 50, or 70 years ago.  This is not just a professional standard that we set for ourselves; this is what’s required from the building industry, local building officials, and/or the insurance industry.  For example, we install Hurricane Clips where the roof structure meets the walls and install metal strapping at exterior wall openings and where the foundation meets the carpentry.  For us, this change happened as a result of Hurricanes Andrew and Hugo.    
This is the way things will be rebuilt on the East Coast in the wake of Hurricane Sandy.  They won’t be the same, they will be better.  It will make the beach homes and cottages cost more to replace because the storms are getting stronger and we know how to design, engineer, and build them better from the start.  There’s no sense in building something that’s going to blow away next year or in the next storm. 
Hurricane Strapping to tie Foundation into Wood Framing
In addition to this, the homes that survived and the homes that will be rebuilt will cost more to insure.  We live in the Carolinas, many states away from the wrath of Hurricane Katrina, but after that disaster our home insurance rates went up noticeably and the insurance companies explained that the increase was due in part to our county being considered as part of the coastal region.  We didn’t like it, but we took it on the chin and rationalized that its part of the price we pay for being less than an hour from the beach.  However, we don’t live on the beach and it some ways it rubs us the wrong way because we must have home insurance... so what are you going to do, but write the check and mail it in.   
As I've already said, I get pretty jazzed up about every part of new construction and renovations, but as the Post-Sandy rebuilding efforts commence, the unanticipated costs need to be considered now, not later.
See The Hurricane House  (Jan. 3, 2012)

Wednesday, October 31, 2012

Don't Beg For Quotes

Most of those who read this post will be familiar with the song by the Temptations titled Ain't Too Proud to Beg.  Well when it comes to gathering estimates for your project, I'll encourage you to think of this song and then ignore it's message.  But this advice is not about pride it's about common sense.  Don't beg for quotes.

I've written more than once that it's important to work hard to get multiple price estimates whether you're trying to sign someone up to re-roof your house, install wood floors in the living room, or agree to take down a big tree in the yard.  Three prices is good, four is better, and five different quotes is ideal.

This is an example of how you get the value of work:  if you get five apples-to-apples prices for something that'll cost three grand, there's a good possibility you'll get estimates like $2500, $2900, $3000, $3100, and maybe $3500.  Assuming you don't know how much this work should cost, you will after you look at the five different prices since $3,000 is the average.

Now, this gets me to today's point.  I'm telling you to work really hard to get multiple estimates, but don't go too far for a proposal and into the area where it feels like you're begging.  Simply put, you don't want to enter into an agreement with someone that sets you up into that circumstance.  Furthermore, if you have to ask them for their number a second time, take this as a red flag and don't forget it.  If they can handle your business, they'll be able to deliver on the task of working up a written price estimate.  It stands to reason that if you have to do anything that feels like begging them for the quote then you'll likely have to do some similar pleading when it's their turn to work or finish their part as required.     

Also, if a business person says they'll get you a price by "tomorrow morning," then they better have it for you by the next day before noon.  However, it's another warning signal when someone promises to provide your written estimate and are late.

If you find yourself working a little too hard just to get a price, that's okay.  Don't hang up the phone or slam the door.  Just acknowledge what you're doing and get the estimate you've been after.  Thank the person for their time, but use someone that quoted you in a timely, professional way.  These may be tradespeople more accustomed to using their hands and tools than office equipment or computers, but providing written estimates is part of the job too and you should accept nothing less than basic courtesy and professionalism.

See Push Hard to Get Quotes (July 9, 2012)

Friday, October 19, 2012

The Social Network and Harvard's Special Old Building

I caught a few minutes of The Social Network last night.  The film about Facebook has nothing to do with renovating old houses or anything closely related to construction, but something grabbed my attention enough that I'm still thinking about it this morning.

There's a scene in the movie where the Winklevoss Twins (played solely by actor Armie Hammer) are waiting to meet with Larry Summers, the President of Harvard.  The receptionist says, "This building is a hundred years older than the country it's in. So do be careful."  Her warning is not connected with Cameron and Tyler's meeting about Facebook or their dispute with Mark Zuckerberg, but it's part of the attitude that the people of Harvard had throughout the film.  However, it's more than attitude, it's an underlying impression that the folks that make up the Harvard community know more than those outside their circle.  In this example, the people that preceded them were wise to build Massachusetts Hall to last and mindful to leave it as it's stood for all these years.  (To be accurate, Mass. Hall of Harvard Yard is not "335 years old."  A little fact checking confirms that it's been standing since 1720, making it's age closer to 292.)

The receptionist represented in the film presumably had nothing to do with any of the decisions to save that old building, but she seemed to hold some pride about working there none-the-less (and I would too.)  To people like me, a building that's almost 300 years old is pretty cool and something to boast about.  The people of Harvard sure aren't concerned about what's cool, but they know having that old building in the middle of campus is something worthy of attention.  It is cool and I think that's why that little line was popped into the movie like it was. 

Going to the trouble of saving an old building or a run-down house is not the easiest path, but there's wisdom in this course.  In the end, having something that's been around for multiple decades (or centuries) is special, unique, and oftentimes better than an equivalent structure that's brand new.  I believe that it's worth the effort to save a decrepit building and the snooty administrative assistant of The Social Network helps make this point for me as she proudly delivers her only line of the film.

If you can save an old home, I'm here to encourage you.  It won't be simple, but if you push forward and do it right, it'll be worth your effort and diligence.  In the end, you'll be proud of yourself and what you have when your finished.   

Monday, October 1, 2012

Step 27 - Completing Tops on Cabinets

Countertops are the obvious partner of cabinetry.  However, I'm describing them as two separate steps because they're different scopes that can have unconnected craftspeople.  When you visit a big home improvement retailer, you'll see all the cabinet and counter samples displayed in the heart of their respective Kitchen Departments because they go together.  Home Depot and Lowe's would love for you to sign them up for everything in your kitchen (Steps 26 & 27), but it doesn't have to be that way.  Keep this in mind and don't be misled by remarks that insinuate some unspoken industry expectation of cabinets and tops always being purchased/installed together as a team.  Or plainly stated, be alert to comments like, "You need to buy it all from us.  This is just how it's done.", "We always do the cabinets and countertops in the houses we do,"  or "Every cabinet shop does all the mill work and tops in the entire house."

To take this point a step further, I'll add that it's not too tough for a DIYer to find someone to do all the cabinetry and counter work, have it completed in a few work days, and then write a check before moving onto the interior doors.  I've done it this way many times myself, but when you're trying hard to stretch your budget (and actively playing the part of the do-it-yourself rehabber) you need to at least realize that paying two separate tradespeople for cabinets and counters is a possibility.  And also keep in mind that it might even help you more to break it down further by considering the kitchen cabinets and their counters as one thing and the bathroom vanities with their tops as something else.  There's more than one way to skin a cat and it's okay to deal with your cabinets and countertops in whatever way works best for your rehab and your bottom line.

And finally, understand that this separation of the cabinets and tops is not just a dollars and cents issue.  You may have a great option to complete Step 26, but maybe this cabinet contractor doesn't install the type of top you've planned for (i.e. granite, marble, tile, etc.).  Don't settle for something if it's not really what you want.  For example, finding yourself saying, "Since our cabinet guy does laminate I guess we'll just go with that instead of the countertops we really wanted."   One trades person can usually do it all, but it may be more economical (and a better match for your vision) if you think of cabinets and tops as two separate scopes of your project.  Link Steps 26 and 27 together if you can, but don't do it because you think you have to.

I'm not going to get into the details of how best to install them, etc.  because Step 27 is something I typically prefer to hire out.  I've done a few kitchen counters myself, but it's not something I'm highly skilled at.  If you can do you're own I'd say "Go for it," but if not just keep in mind what I've said regarding the relationship between cabinets and tops along with my advice in previous posts; ask questions, spend some time getting more knowledgeable, and work hard to get multiple quotes. 

Top Ten Kitchen Countertops at About.com

Wednesday, September 26, 2012

Step 26 - Installing Cabinetry

Next on the list:  Cabinetry.

Most of the time, money, and attention to complete Step 26 will be spent on the cabinets in the kitchen, but this is also the time to install cabinetry in the bathrooms as well as the laundry room, home office area, and the garage if applicable.

At the Fire House, I hired a custom cabinet maker.
They built them off-site and then installed them.
I've completed Step 26 in several ways; I've hired a custom cabinet maker to build and install the units when we're ready, I've built and installed them on-site myself, I've purchased units from warehouses or salvage dealers, and I've bought the boxes from one of the big chain DIY/building suppliers, assembled, and installed them before I trimmed out around them.  As I've mentioned in previous posts, every project is different so you won't hear me saying cabinets must be done a certain way every time. 

Although this cabinetry looks a lot like the units in The Fire
House, these boxes came disassembled from a big box store. 
I put them together in The Bungalow & installed them myself.
Any custom cabinet maker will want to do all the cabinetry, but I have to stretch my money as far as I can and breaking the kitchen cabinet scope off from the rest of the house has worked well for me.  And, although the source or supplier may differ, the timing is the same and the kitchen units and bathroom boxes always get installed after the floors and before the counters.   

And finally, on the topic of timing, if you're installing the cabinets yourself, remember to install the wall cabinets first.  Get those right and then dig into the base cabinets below.  

At The Cottage - I did built-ins in the kitchen.  I like how they turned out, but this is a scope of work I've only taken on this one time and definitely one of those things that I thought would be easier than it was. 


Friday, September 14, 2012

Michael Keaton: Here You Are Again

We love movies and Michael Keaton has always been one of my favorite actors.  I guess he has an everyman type quality that makes him seem like someone I know.  I really get his sense of humor and I laugh when he's trying to be funny.  I feel like I can relate to many of his characters so perhaps this is another clue to his success in Hollywood. 


Along with being a hands-on home builder and renovator, I’m oftentimes wrapped in the middle of things at home and with our family.   I've had regular Mr. Mom flashbacks as I'm changing toxic diapers, screwing up the well-known routine at school, or in over my head with house cleaning or childcare duties.  And occasionally (on a rehab) I'll throw out the Michael Keaton quote (my favorite from Mr. Mom) when someone asks me about how extensively I'm upgrading the electrical system: "Oh, I don't know," I'll say casually.  "220, 221...whatever it takes."  Who doesn't love that line? 

Now, as much as Mr. Mom, I feel like I can relate to Michael Keaton's role in the movie Multiplicity.  They say a contractor’s home is never finished and MK's character fits this description in this film (with Andie MacDowell.)  But more than having incomplete honey-do's around the house, Keaton is trying to juggle condo construction and commercial projects with smaller residential jobs as he tries not to lose his mind as he deals with tradesmen and subcontractors plus his boss/clients/inspectors/wife/children that he's trying to satisfy at the same time.  Keaton's character needs a break and he clones himself in a desperate move to get things done, keep everyone happy, and maintain his own sanity.  I can relate to this since I've found myself wanting a twin (that knew what I knew) who could help me when things were on the verge of being out of control.

I also really like The Other Guys (starring Will Ferrell and Mark Wahlberg).  Now MK may not have one of the lead roles in this movie, but I love the part he plays none the less.   As I’ve said before, on my Pig's Ear renovations, I want and need tradespeople who know how to handle unexpected challenges when they pop up.  We need skilled contractors who don't get rattled.  Like Michael's TOG character (and TLC) said, "I don't want no scrubs."

In Pacific Heights, Keaton epitomized the worst tenant imaginable.  I've thought of this character when I had a renter who was giving me an unusual amount of headaches.

But when it comes to a day that reminds me of one of Michael Keaton's movies, today was a memorable day because today I was Batman.  I put on the caped crusador's costume for our neighbor's 5th birthday party.  The get-up was crazy hot, but it was fun.  I liked being Batman.  I liked walking around hearing strangers whisper excitedly, "Look.  It's Batman!"  It was more than just fun, it was a blast.   

I feel like Mr. Mom sometimes, I’ve been a lot like the frazzled builder from Multiplicity who doesn't want scrubs on the job, and more than once I've been the landlord trying to get rid of a Pacific Heights nightmare in one my units. But today was a cool day.  Today my little girl came up to me at the birthday party where I was dressed liked Batman, she recognized me immediatley, and said, "Hey, Dad," before she gave me a sweet smoochie.  Today, I was Batman and it was pretty great.        

Tuesday, September 4, 2012

Step 25 - Flooring

First off, when I have existing cabinets that don't need to be pulled out, I leave them in place.  Same with flooring.  However, on a renovation gut job (or with additions and new construction) the next thing I do after the drywall is hung (and insulation is blown up top) is flooring.

I still remember being a little surprised by this when my career progressed into the residential side of the construction industry.  I had this mindset that all flooring should come at the tail end of the project.  Carpet and the finishing of raw or salvaged hardwoods do come at the end of the job, but tile, laminate, wood, vinyl, and linoleum get installed before the cabinetry.

There are some technical reasons why flooring comes next.  For one, this could limit moisture from finding it's way into base cabinets (unlikely, but possible if the units are directly set onto a concrete slab).  Another technical reason for installing flooring before cabinetry is related to cabinet height.  If you put down floors after a 36" kitchen cabinet or bathroom vanity, you can lose over an inch in height (depending on the type of flooring).  Some people will be oblivious to this height difference, but others appreciate every inch of height when they lean over into a sink and can pick up on this subtle loss.  And on top of this, you'll lose this inch of space at the toe/kick area and it can be noticeable there as well.

However, the main and most obvious reason to install the flooring before the cabinetry, doors, and trim is money.  It's easier, therefore cheaper, to do Step 25 before Step 26 and the others that follow.  It's less labor intensive and you can really blow and go without the cabinetry in your way.  Another reason why this is the time to install flooring is that you can hide more of your cuts when you put the floors down first.  You can be less spot on with wood or laminate flooring at the edges of the room, you can have jagged or inexact cuts on ceramic and marble tile in comparable conditions (the perimeters), and you'll get away with more play in your vinyl or laminate placement/glue downs.  Then as I just said, you can hide all these cuts under the cabinets, the base trim, and the casing at your doors. 

If you do the flooring later you'll have to hide all your cuts with quarter round/shoe mold and you'll be finding yourself getting creative with caulking at the bottom of the door casing where it meets up with the floor.  It can be done, but it will take longer and may make your floor finishes look jacked-up.  So, if you can install your flooring before cabinets, interior doors, and trim, then get it done.

The Fire House at the Kitchen Window during demo. 
The Fire House at the Kitchen Window after heart pine was installed.  The previous owners had installed the hardwood in the foyer and hall and I continued this flooring into the kitchen.
The Fire House at the Kitchen Window after cabinets and trim.


One of the units in the Duplex before I opened things up and carried the existing laminate flooring into the rest of the unit.

Same view.  I didn't pull out flooring if I didn't need to, I left the base cabinets where they were in the kitchen, and installed the flooring around them. 
    

Friday, August 24, 2012

Step 24 - Blown Insulation

There's not much to say about Step 24, but you can't cross this task off your list until the drywall has enclosed the attic. 

You can rent the equipment to do this yourself and I think nearly all hardware or home improvement stores have these rigs (see light blue box in photo below)  on site for customer usage.  This is a two person job from the beginning.  You need two sets of hands to get the machine in and out of your vehicle, but most importantly you need two people to get this job knocked out; one person feeding the machine on the ground and the other in the attic controling the hose. 

Insulation Blowing Machine w/ Bags of Insulation

There are jobs when it's more practical for me to use batt insulation in the entire house, but when we have blown insulation in the attic, I typically make this part of the agreement with my insulation contractor (see Step 22 - Insulation) and all it takes is a phone call. 

This is an important part of any project, but the cost is minimal.   

Wednesday, August 22, 2012

Step 23 - Interior Skin

Drywall is the same as sheet rock which is no different than wallboard, just like soda is a soft drink, but also called pop.  It's all the same, but it's also regional terminology that varies from one part of the country to the next.  As some are overly insistent that a carbonated drink has one correct nickname, there are folks out there that will debate that plaster pressed between paper in 4' x 8' (or 12') sheets is called drywall or wallboard or sheet rock.  I'll just suggest, that if the people in your part of the world call it 'wallboard' then call it that and if the construction community around you say it's 'drywall' then latch on to that label.  They may even call it gyp-board, durorock, plasterboard or some other comb-derivation.  Just go with the flow and keep moving ahead. 

After insulation & before sheet rock
With that out of the way, let's talk Step 23 and understand I'm using all these tags for plasterboard interchangeably.

The day after the drywall is complete is one of my favorite days on any rehab or new construction project.  It's so great.  Everything takes shape in a matter of a few days.  What I've imagined and seen in my head is suddenly a lot closer to reality.  Sure we're not all done yet, but on these mornings, it feels like we've made a gigantic leap toward the finish line. This is such a huge payoff day for me and I meander happily for a while from room to room.  Back and forth between the kitchen, bedrooms, and baths.  Up and down steps and hallways.  I see how things look and take in how they feel with me standing inside them.   All my projects have been very different, but this satisfaction after the drywall is the exception since it's always the same.  I love it.  Those who've been in this position know what I mean and if you're heading this way get ready to enjoy this moment when the wallboard has been hung.   

The same window on the left.
The sheet rock phase goes through a couple stages of it's own before Step 25 - Flooring.  The drywall gets hung.  Then the tradespeople tape, bed, and skim the joints.  After that they come in to sand before any touching up is done.  It's not uncommon for these three different parts to be knocked out by three completely separate crews of workers.  My sheet rock contractor is awesome, they run a well-oiled operation, and I've gotten really comfortable with the way they do things.  (Perhaps they've spoiled me.)  However, I've had to work through some not-so-great drywall teams that made Step 23 more difficult than trying to build a house without a tape measurer.  So, let me encourage you to be grateful when you get hooked up with a good contractor and, as I've said before, don't keep that appreciation to yourself. 

Painting can inadvertently accentuate dings, dents, and wallboard imperfection.  Our drywall contractor always gives us a 30 day window to trim/out and paint before calling them back for touch-ups.  I should also say that every job is different and this touch-up arrangement can get navigated/negotiated slightly depending on the project.  However, even though it's never been a major issue on my houses, I know sometimes this can be a contentious area between general contractor (homeowner) and drywall sub so be ready to do what's needed to work your way through this touching-up issue to get the finished home you want.

Finally, while the drywall team does their mud work and sanding, have the attic blown with insulation - Step 24 (if you didn't insulate the ceilings with Batt in Step 22) and start gearing up for the flooring that has to be done before the cabinets and counters get installed in Step 26.

Thursday, August 16, 2012

The Kitchen House at Sutherland

I love renovating extremely run down homes (aka Pig's Ears), but I also get pretty jazzed about other people doing the same thing.  The Kitchen House at the Sutherland Mansion (Petersburg, Va.) is a great example of a building that was brought back from the edge. 

The Kitchen House at Sutherland - Condemned

Sutherland is a Civil War Homestead built between 1860 and 1862.  Like many other homes of this era, the big house construction included outbuildings which are also referred to as dependencies.  The Sutherland Mansion had two:  an attached carriage house (lost in the tornado of 1993) and a detached brick structure that originally served as the summer kitchen.  In the mid 1980's, a devastating fire made the 950 square foot Kitchen House inhabitable.  Vacant and abandoned, it began to decay.  City officials condemned the building and put it on the demolition list.   

I don't know Walt and Roberta Purcell, but I am a fan.  They resurrected the Kitchen House into a charming home that's now a work of art.  They saw the dilapidated dependency full of rot and debris (as well as birds and squirrels) and they took on the challenge.  The Purcells realized the building was too special to overlook, understood it's potential, and made the most of what had stood the test of time. 
 
After - What a gem.

Well done Roberta and Walt...a thousand times, well done. 


The Bedroom - Before

The Bedroom - After.  Excellent


The Kitchen - Before
 
The Kitchen - After.  Same fireplace on the left.  More brick w/ shaker style cabinets & soapstone sink.


The Bathroom - Before. 

The Bathroom - After


Living Area - Before

Living Area - After 
(After pictures by Patricia Lyons, Styling by Sarah Hurst)


Floor plan by Ian Warpole


As I've written before, you can turn a pig's ear into a silk purse.  It's not easy, but it is possible

The Sutherland Mansion is owned by Roberta's son Greg Werkheiser and his wife Marion.   

Tuesday, August 14, 2012

Step 22 - Insulation

Insulation gets put in after the rough-in inspections are passed and right before drywall.  Seeing the insulation in place is a payoff similar to completed sheetrock (yet not quite as rewarding.)   Consider the conditions on a renovation before the insulation is installed.  Old dark wood and bright clean lumber are oftentimes nailed in the walls next to the new framing material that's clean and bright.  Running through all this structural framing is yellow, black, and white electrical wire mixed with red, white, and blue plumbing and silver duct work.  Seeing the uniformity that comes with installed insulation brings a change to the interior and a hint that the finish line is out there.

A couple things regarding insulation that may be off the radar of someone who's never renovated or built a home before.  First, the two most common types of insulation are batt and blown.  Batt insulation is what comes in rolls and looks like pink, yellow, or white cotton candy backed with paper that faces the heated space of a building.  This goes in the walls, under the floors, and can go in the ceilings.  Blown insulation is the stuff that looks like fluffy snow (but also can be gray or pink.)  It's used in attics most frequently, but in older homes where insulation is missing on the exterior walls, blown insulation may be the best way to insulate the vertical walls as well.  I saw an episode of Rehab Addict where Nicole Curtis and her team put plastic inside over the laths and then blew insulation from the top down through each cavity on the home's perimeter.  Also, I'll add that I heard Mike Holmes (Holmes Inspection) singing the praises of spray foam insulating the entire home in lieu of batt or blown.  SFI has never been the way for us to go on any of the renovations or new homes I've done.  We use SFI in the holes left after rough-in and for any small cavities, but this is to keep insects and lizards from coming inside.  This material comes in a can and is minimal, yet effective the way we use it and a routine part of Step 22.

Batt Insulation

Thick blown insulation with baffles running up through the roof joists.


VRPF Insulation - bathroom.
In the bathrooms we always use vapor-retarder plastic faced insulation shown in the picture on the right.  However, you can also install plastic as a vapor barrier that will keep moisture in the bathroom from becoming a mold issue inside the walls around the bathroom. 

Also, I want to point out the need for roof ventilation baffles.  These are Styrofoam materials that feel and resemble Styrofoam egg cartons.  They can be stubbed out (as shown in the photo with the blown insulation above) or in the case of a sloped ceiling covered with drywall they may run a longer length between the roof sheathing/planks and the insulation. These baffles are significant because they insure air flow from outside vents up and out through the attic.   Without them, the attic will be hotter than it needs to be in the summer and the roof will have a shorter life than predicated by the manufacturer's warranty.   

Although, I have taken on the insulation scope on a couple of my jobs, I've veered away from that on the majority of my projects because I have a dependable company here that does a great job for me.  They're efficient and highly reputable and have never failed me or the local inspections we're required to pass.  Along with that it's cost effective because they always knock this work out for me in one day whether I have a small project or a large house that's several thousand square feet.  They do it all; the batt, the blown, the spray foam of the cavities, and the baffles.  If you have a company like this in your area and they can do it for you for the same cost as you doing it yourself, I'd encourage you to use them.

After the insulation is complete prepares the home for one of my favorite times of any project:  Step 23 - Drywall/Sheetrock/Wallboard.

Saturday, August 11, 2012

Step 21 - Addressing Pest Control

After the crews are done with their rough-in and before the insulation and drywall teams cover things up inside,  I make sure to squeeze in the soil treatment for pest control. 

We live on the fringes of South Carolina's Lowcountry.  Not only are we miles from the Atlantic, but we have areas that are near or below sea level.  Basements are rare here and most of our houses are built on slabs, crawl spaces, or above drive under garages.  The homes I've taken on have been on crawl spaces 18" - three feet high or a combination of slab and crawl space.  So, as I talk about soil treatment and pest control, keep this in mind.  Where ever you are, you should still be mindful of treating your property for bug infestation, but you may just knock this out at the end, when the rest of the work is complete.

I call for the soil treatment after the rough-in because at this stage, the R/I crews will be done with any necessary digging.  My pest control guy has periodically reminded me that it's best to treat the ground after it's done being disturbed, so that's why we have this work done after the rough-in crews have moved on.

Pest control is another example of a scope in which you have to do your work ahead of time so that when R/I is done all you need to do is make a phone call, stay out of the way, and then pay up.  Now, when I don't know anything about something, I start talking to people who do.  Then I ask plenty of questions so I can make a wise decision.  Like with other trades on a renovation, you may just need to work the phone (and the mouse) to get smart on what you need to do regarding soil treatment and pest control.  That doesn't mean just getting multiple prices from contractors, but understanding what you need and what you're responsibilities are before it's time to make a decision and enter into an agreement.   

After the soil treatment, a vapor barrier (6 mil plastic) goes down in homes in which the crawl space has been treated.  This really doesn't have to be done until the very end, but I like to do it after the pest control and before insulation.  The insulation crew will appreciate it and it makes things easier for me when I check behind them.  Just like soil treatment is a necessity in our area, this plastic is not for comfort.  It's integral in Lowcountry buildings because it helps control moisture under the home.

After the soil treatment we're ready for Step 22 - Insulation 

Wednesday, August 8, 2012

Some Like it Hot, Some Like it Cold

Heating, Ventilation, and Air Conditioning (HVAC) rough-in follows the electrical R/I on my projects.  For me, the rough-in for the heating and air usually comes down to unlocking the door and getting out of the way.

On one hand, I'd like to tell you this is just luck.  However there's a little more to it than being fortunate.  In Push Hard to Get Quotes I described how important it is to get multiple estimates. The HVAC part of the job is a good example of where this time and due diligence will pay dividends.  When I talk to the HVAC contractors who visit my houses before they give me a quote, I really make an effort to pay attention, ask questions, and listen closely (and maybe scratch down some notes).  These walk-thrus are interviews and I'm always mindful of the big question:  "Can this contractor do this job for me?"  It's not solely about price.  I have to bring someone in who's qualified, experienced, licenced, insured, organized, and well-managed.  More simply put, I need someone who can deliver, perform, and stand behind their work over time.  Heating and air conditioning R/I day is not the time to figure this out.

Finally, I should mention that as the owner/general contractor on my projects I am expected to have a place prepared for the HVAC crew to set their units and it's my job to make sure these areas are accessible, ready, and all theirs when they arrive.  For the most part, they'll have first dibs on the space under the house or in the attic to set their equipment and to run their trunk lines and duct work.  In addition, they may have some cavities/chases designated just for them or may work some ducts through the floor joists.  However, I may also need to have a platform built for them beforehand, but when this is needed it's discussed and understood ahead of time.  Either I build what's needed myself or I have the framing crew do it.

So, if you do your part, HVAC rough-in will be pretty effortless (for you) because you won't have to do much other than standing clear and being ready to write a check after the crew passes the R/I inspection.

See Step 17 - Bring in the Reincarnation of Einstein (Plumbing Rough-In)

See Step 19 - Pulling Wire:  Electrical Rough-In

Monday, August 6, 2012

Pulling Wire: Electrical Rough-In

Before insulation and drywall, the rough-in needs to be complete.  As I mentioned in my description of Step 17 (Bring in the Reincarnation of Einstein), I prefer to stagger the crews roughing things in with the plumber leading the way.  However, if the home is large enough or you have a super-tight schedule, all three trades (plumb., elec., HVAC) could be working inside the house together at the same time, and rough-in can be knocked out in a week (if not a few days).

The way I manage the plumbing and electrical scopes are similar in that I supply the fixtures for both trades.  However, the electrical part of the renovation is a little different than the plumbing because of the "see and touch" guideline.  With plumbing, I buy and hand over everything that people will lay their eyes and hands on, but this rule of thumb doesn't hold true with the electrical scope of work since they supply quite a few things that are part of the finishing/trim-out phase.  The switches, receptacles, and wall plates are an example since they're all part of the electrician's quoted scope.  If I want something special like a dimmer switch, I'll supply that with all the light fixtures, ceiling fans, dishwasher, built-in microwave, smoke detectors, water heater, etc.  They also supply the breaker box and circuit breakers as well as the meter can/box, HVAC disconnect/shut-off, and weather proof receptacle covers on the outside.  I don't have anything to do with any of the electrician's wire either.  They know what they need, where to get it for the best price, and they furnish and install all of that as well. 

As I just mentioned, I supply the fixtures the same as with the plumbing and just like I need to have the shower valves on site before the plumber starts, there are a few items I have ready for the electricians on their first day of R/I.  Number one, they're going to need any recessed can lights.  Secondly, the wire pullers are also going to need the ventilation fans for the bathrooms.  The third thing I have ready for them on day one is the door bell.  In some circumstances these things can be installed with other things at the finish stage, but it's so much easier to do it when the walls are open and this also makes it easier to make sure things end up where I really want them. 

If there's anything special as part of home entertainment, a computer network, or a security system this is the time to discuss and/or coordinate the details with the electrician.  I typically don't get too elaborate in these areas and what I do for TV, telephone, and Internet are most often considered standard.  However, like the dimmer switch, if it's special or unusual, I'll be prepared to provide it and maybe pay the contractor a little extra for doing something they don't do on every job.  In addition, they're required by code to install the smoke detectors throughout, but if I wanted something extra like carbon monoxide detectors, in our part of the country it's not required by code and could cost a little more to have done (but probably not).

Copper is expensive so all the wire is not cheap, but still, I don't pay the electrician until their R/I is completed and OK'd by the local building official.  This way, if something has been overlooked, the electrician is motivated to get back quickly for the required corrections.  I can pay them before the inspection and any licenced electrician I hire will come back to make things right.  However, we're all busy and the electrical contractor will figure out how to get back a lot faster (and with less phone calls, e-mails, or texts) if they aren't getting paid until the inspector has signed off on their part.

Sunday, July 29, 2012

Renovation vs. New Construction

The question comes up frequently in various forms. Is it cheaper to: a) renovate or b) tear down and build from scratch?  The answers vary.  Sometimes an experienced builder flatly answers, "Yes. It's always cheaper to demo the old and put up something new."  Other times a construction veteran will simply explain that more information is needed to answer the question.  Then there are other more complicated responses that identify geography, weather, the economy, and a list of other factors that impact a building project.  Bringing down a dilapidated home may be the way to go, but not always.

When the television program Extreme Makeover Home Edition started airing in 2003, I made sure to catch the first few episodes because what I do is sometimes described as 'extreme home renovating.'  If I remember accurately, the initial houses were not tear-downs.  They were major rehab efforts and total gut-jobs, but Ty Pennington and the gang worked with the original bones of the family house, redid it, and made improvements.   I like that concept.  Salvaging what's worth keeping, getting rid of things that need replacing, and making a house better than it was.  However, somewhere in the shows early history they started taking the house down to the ground, hauling everything away, and starting over.  I loved the whole idea of the EMHE team giving a special family a fresh start and all, but to be honest I was most interested in the construction stuff and the before/after transformations.  Demoing the old and rebuilding new?  That's not the way I do things, and after the first season I tuned out more than I tuned in. 

Last week, I priced up a small project in Charleston, South Carolina.  Although this prospective renovation was within one of the historic districts, it was only 36 years old.  When estimating for a renovation, you have to be ready for unexpected costs that may be hidden.   In this project, I had to prepare my friends looking at the property for all the unexpected expenses.  This makes the cost number higher now than it might actually be down the road when everything is said and done, but I think this is the best approach.  I could have given them an overly optimistic estimate and then explain later why things cost more, but that's an unnecessarily bumpy path to take.  This reality is at the heart of cost comparisons regarding rehab and building totally new.  In general, a renovation is more challenging, more work, and less predictable.  Easier translates to cheaper.  That's why new construction gets the green light so frequently. 

In my view, newer is not necessarily better.  Look at the City of Charleston again as an example.  The Holy City has not just accepted it's old buildings, it protects and treasures them.  The Board of Architectural Review (BAR) has jurisdiction over all the city's buildings and requires a review of work on any buildings over 75 years old.  This is not a control issue.  This is a money issue.  Tourists flock to our city because of it's history and all the old preserved buildings that help tell the stories of the past.  So if you think about it this way, it costs money to save old buildings, but it can pay dividends that make it worth the effort.  As a side note, Charleston does allow new construction, but they are involved in the process from the start and the new buildings often look like others that have stood for hundreds of years. 

Too frequently, I see great old buildings getting torn down and hauled to a dump site.  Then something new goes up that's shiny and modern, but a building that's not necessarily an improvement over what had been sent to the landfill.  At times, I learn later that the contractor convinced the decision makers that tearing down was the best way to go.  I agree, it was the best way to go for the builder, but I won't say it's always been best for everyone else.  The people and the community may save some money in the short run, but over time, when all the area's old buildings start disappearing, a warm community starts to evolve into a something less charming, somewhere people don't want to live, work, and do business. 

And finally, I'll end my rant with a really great example of why sometimes, renovating an old home is the way to go.  I'm linking up with thisoldhouse.com for the pics because the before/afters do a lot to help share this story.  A young woman (Tara C.) and her husband decided to save a home in rough shape that was located on family land.  Her grandfather and great-grandfather had built the home and the young couple and her father worked together to renovate it.  This is better (not easier) than tearing down and building new for so many reasons, but the one I think of most clearly is that someday, this couple will hopefully have a family of their own and Tara can tell her child (or children) that four generations of men in their family (and Tara herself) worked on that great house. 

The Tara C. Family Home - Before
After
Look at that after pic above.  That's the same house!  Results like these (and the stories/history that come along for the ride) are why... in the battle of Renovating vs. Demolishing and Building New, I'm cheering for the rehab effort more than it's rival most of the time.