Sunday, July 29, 2012

Renovation vs. New Construction

The question comes up frequently in various forms. Is it cheaper to: a) renovate or b) tear down and build from scratch?  The answers vary.  Sometimes an experienced builder flatly answers, "Yes. It's always cheaper to demo the old and put up something new."  Other times a construction veteran will simply explain that more information is needed to answer the question.  Then there are other more complicated responses that identify geography, weather, the economy, and a list of other factors that impact a building project.  Bringing down a dilapidated home may be the way to go, but not always.

When the television program Extreme Makeover Home Edition started airing in 2003, I made sure to catch the first few episodes because what I do is sometimes described as 'extreme home renovating.'  If I remember accurately, the initial houses were not tear-downs.  They were major rehab efforts and total gut-jobs, but Ty Pennington and the gang worked with the original bones of the family house, redid it, and made improvements.   I like that concept.  Salvaging what's worth keeping, getting rid of things that need replacing, and making a house better than it was.  However, somewhere in the shows early history they started taking the house down to the ground, hauling everything away, and starting over.  I loved the whole idea of the EMHE team giving a special family a fresh start and all, but to be honest I was most interested in the construction stuff and the before/after transformations.  Demoing the old and rebuilding new?  That's not the way I do things, and after the first season I tuned out more than I tuned in. 

Last week, I priced up a small project in Charleston, South Carolina.  Although this prospective renovation was within one of the historic districts, it was only 36 years old.  When estimating for a renovation, you have to be ready for unexpected costs that may be hidden.   In this project, I had to prepare my friends looking at the property for all the unexpected expenses.  This makes the cost number higher now than it might actually be down the road when everything is said and done, but I think this is the best approach.  I could have given them an overly optimistic estimate and then explain later why things cost more, but that's an unnecessarily bumpy path to take.  This reality is at the heart of cost comparisons regarding rehab and building totally new.  In general, a renovation is more challenging, more work, and less predictable.  Easier translates to cheaper.  That's why new construction gets the green light so frequently. 

In my view, newer is not necessarily better.  Look at the City of Charleston again as an example.  The Holy City has not just accepted it's old buildings, it protects and treasures them.  The Board of Architectural Review (BAR) has jurisdiction over all the city's buildings and requires a review of work on any buildings over 75 years old.  This is not a control issue.  This is a money issue.  Tourists flock to our city because of it's history and all the old preserved buildings that help tell the stories of the past.  So if you think about it this way, it costs money to save old buildings, but it can pay dividends that make it worth the effort.  As a side note, Charleston does allow new construction, but they are involved in the process from the start and the new buildings often look like others that have stood for hundreds of years. 

Too frequently, I see great old buildings getting torn down and hauled to a dump site.  Then something new goes up that's shiny and modern, but a building that's not necessarily an improvement over what had been sent to the landfill.  At times, I learn later that the contractor convinced the decision makers that tearing down was the best way to go.  I agree, it was the best way to go for the builder, but I won't say it's always been best for everyone else.  The people and the community may save some money in the short run, but over time, when all the area's old buildings start disappearing, a warm community starts to evolve into a something less charming, somewhere people don't want to live, work, and do business. 

And finally, I'll end my rant with a really great example of why sometimes, renovating an old home is the way to go.  I'm linking up with thisoldhouse.com for the pics because the before/afters do a lot to help share this story.  A young woman (Tara C.) and her husband decided to save a home in rough shape that was located on family land.  Her grandfather and great-grandfather had built the home and the young couple and her father worked together to renovate it.  This is better (not easier) than tearing down and building new for so many reasons, but the one I think of most clearly is that someday, this couple will hopefully have a family of their own and Tara can tell her child (or children) that four generations of men in their family (and Tara herself) worked on that great house. 

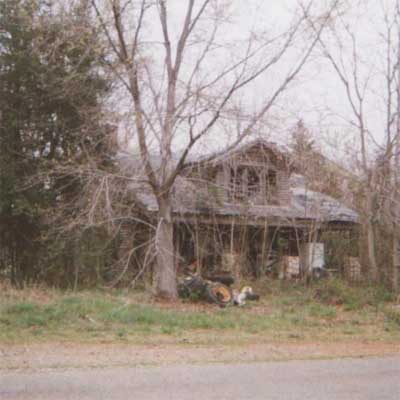
The Tara C. Family Home - Before
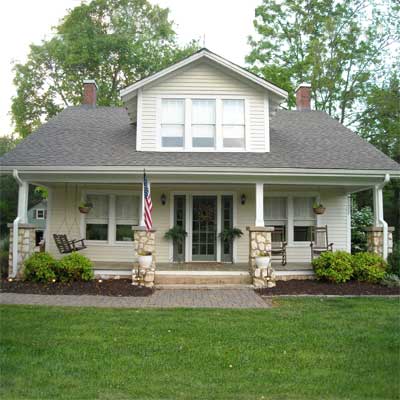
After
Look at that after pic above.  That's the same house!  Results like these (and the stories/history that come along for the ride) are why... in the battle of Renovating vs. Demolishing and Building New, I'm cheering for the rehab effort more than it's rival most of the time.   

Tuesday, July 24, 2012

Kayleen McCabe on Rescue Renovation

Rescue Renovation on DIY helps viewers see that sometimes projects turn south, come to a halt at a dead end, and need help.  However, Kayleen McCabe and her team do more than that, they focus in on the issues that have snuffed out the rehabbers progress and help them race over the speed bumps that have turned into road blocks.     

Before you begin a renovation project, you have to be ready to expect the unexpected.  These words are easier to type than they are to embrace.  No driver wants car problems on a busy day and a first time rehabber doesn't want to open up a wall to find unanticipated issues either.  The thing is, if you're going to drive a car you're going to have days when you turn the key and get nothing.  Something similar goes for the DIYer renovating their home because there will be challenges that could not have been planned for.

Back to Rescue Renovation.  Kayleen and her crew are like Construction EMT's making a week long house call.  McCabe and her skilled gang don't just revive the project, they leave it better than the confused renovators had planned for it to be.  Two intertwined scenes stuck out for me in my initial viewing of RR.  The homeowners (Seth and Allison Rankin) had halted their kitchen redux when they wanted to eliminate a wall, but weren't sure if they could.  KMc and crew got professional direction from a structural engineer and then put the kitchen back together. 

Here's the second issue that caught my eye:  Kayleen and Allison easily took down an over-sized mirror because the Rankins had come to believe that they couldn't do it.  This mirror removal was easy.  Seriously.  Kathie Lee and Hoda could have done it, but because of the wall issue the homeowner's confidence had been popped and they were apprehensive about some of the other easy things that seemed bigger than they needed to be. 

When it comes to the difficulties you'll face in a home renovation, think about what our Mom used to say often: "Don't make a mountain out of a mole hill."  If you get into a jamb, get a second opinion from a General Contractor or an engineer.  Paying a professional for some advice is better than throwing in the towel or just sitting there like a hitchhiker thumbing it for an hour when they could just walk half a mile.  Just be ready to be faced with things you're not ready for and allow for unexpected setbacks before you start.  Maybe you'll catch a break and everything will go smoothly with your rehab.  You can tell everyone about it when your through and they'll leave your house thinking you're really lucky or a big ole' fibber.         
 

Monday, July 23, 2012

Step 18 - Exterior Caulking and Painting

The Fire House - Just before be painted.
A great time to dig into the exterior is while the plumbing, electrical, and heating/air conditioning crews are busy with rough-in on the interior.  Clearly, the painting of the exterior is closely tied to Step 16 - The Exterior Façade.  However, if the home has been buttoned up with maintenance-free materials, the exterior caulking/painting may be minimal.  As I've written previously, all of my properties have been different inside and out so the scope of exterior painting and caulking has never been the same either.  For example,  The Fire House got painted from top to bottom; the exterior walls (with their weeping joints removed), the soffitt, the fascia, the front porch posts, and porch ceiling...all of those areas were brightened up with paint.  The Bungalow was fiber-cement sided and comparable in terms of painting on the outside, but on this one the soffitt was vented vinyl.  The Hurricane House was brick, but with maint.-free metal fascia and vinyl soffitt.  The front door and matching wooden shutters were painted on the outside of this home, as well as the trim around the windows, but that was it. 

Paint makes a big impact.
Caulking serves more than one purpose, but it's main job is to seal up small gaps.  It helps keep water and small critters from finding a way inside the house.  However, caulk can also make an average carpenter look good and great carpentry work look perfect.  I never really understood the impact of caulking until I worked on a prison where everything had to pass what we called 'the razor blade test' - if an inmate could slip a razor blade into any gap or crevice, we had to have it caulked with 'security caulk.'  On this big project we hired a caulking subcontractor.  The company sent us a three man crew that did nothing but caulk eight hours a day for weeks.  It was a lot of tedious (and sticky) work, but it was necessary and it made a big difference in how secure things were when we were finished.  In addition to that it helped make everything look clean and tight visually.  This project really drove home for me how caulking can give a painting job the finished look that oftentimes makes a professional's paint work look so much better and more complete than an amateur's.  So, don't forget about caulking before you paint.

A decade ago, I didn't really enjoy painting.  However, I can't say that now and periodically I like getting lost for a few days in a large painting task.  There are two things I've learned that make painting more enjoyable for me.  First, you have to keep your brushes clean.  Secondly, you have to take the time to prep properly (which includes caulking before-hand and allowing adequate drying time).  These two things make a huge difference and understanding the importance of them makes painting more fun and productive.

It took this painter three years to finish the siding and exterior trim on The Bungalow, but she wrapped things up just in time to start kindergarten.  Use big paint brushes for large areas & smaller brushes for trim.  Don't break out the watercolor brushes unless you're painting intricate details on a Victorian or ... teaching a toddler how to paint. 


Tuesday, July 17, 2012

"The Perestroika/Glastnost Approach"


The properties I've bought to renovate have always come with existing additions or modifications and I haven't necessarily been wild about what the previous owners did.  However, for mainly structural reasons, my predecessors decisions have always factored into my changes.  Sometimes their remodels have been a dominant influence on how I re-worked the layout and on other projects what they did to the house has played a more subtle role in my final design.

Each of my Pig's Ear renovations have been different.  However, they've all been similar in that my visitors routinely comment that my finished homes feel bigger than their respective square footage sizes.  Someone probed me once about this openness.  They were curious and seemed to really want an explanation for why I tore out walls and redesigned the floor plan with multiple columns and headers.  I didn't have a well thought out answer and I ended up saying something like, "It's sort of the perestroika/glasnost approach, I guess... I tear it all down and then I try to open things back up when I rebuild it."

The expression on my interviewer's face seemed to say, "Sorry I asked."  My answer was just what popped into my head and it came out of my mouth as I thought it.  It was what is was.  All I can add to that today is that I've never given that answer a second time.  I have an associate degree in construction engineering, but also have a B.A. in international affairs and although my two degrees are not alike, maybe they come together in my mind in moments like this when I mutter an off-the-wall answer like, "It's sort of the perestroika/glasnost approach."  

Finally, I'll admit that I've heard the late President Reagan's voice during the demolition phase.  It's echoed in the back of my thoughts in a grandfatherly way, very supportive and full of encouragement as I've swung my sledge hammer.   "Mr. Renovator... tear down this wall."


See Step 6 - Sketch Out Your Floor Plan

See Step 8 - Redraw Your Floor Plan

Thursday, July 12, 2012

Bring in the Reincarnation of Einstein

“If I had my life to live over again, I'd be a plumber.”

Albert Einstein


When the framing is complete, I bring in the plumber.  The electrician or the heating and air team may want to do their rough-in work first, but in my view the plumber needs the green light before those other two trades. It's easier for the electrician to weave his wires around the plumbing and a good HVAC contractor can set up his system after the other two are long gone.  Like I've said before, what I'm describing is how I do it and a routine that I've grown into over dozens of projects (commercial and residential) and renovations as well as new construction.  It's not the way, it's just what I do.

Now, I always supply my plumbing contractor with the things people will see and touch when the project is complete; faucets, sinks, shower units, etc. ...those are all chosen, grabbed up, and paid for by me.  Understand that I don't buy the supply lines, PVC pipes, connections, or fittings.  They take care of what goes inside the walls, under the cabinetry, beneath the floors, and up in the attic while I provide the fixtures everyone will see when the tradespeople have moved on to the next job.

After Step 16,  I am responsible for a few key things as part of the plumbing rough-in.  For one, I make sure the tub/shower units I've purchased are in the house before the plumbing crew starts.  Along with that I also have the shower or tub valves ready.  Water heaters, kitchen faucets, commodes... the plumber doesn't need any of these things until trim-out (after the painting, cabinets, and counters - See How I Do It), but he needs the built-in bathroom units and the valves right away, so if you do it like me (and supply them), have all this material ready on the plumbing crew's first day.  After this, all I do for the plumber is make sure the house is unlocked and try to stay out of the way until he passes his rough-in inspection.

I don't want to make this sound harder than it really is.  Furthermore, this is not textbook information.  Like a good chunk of what I get into on BSAPE, I figured some of this out over time working for other people and parts were learned the hard way...like having the plumber calling me at seven in the morning saying, "Dude...where'd you hide the shower valves?  I thought you were providing them."  The handles that you turn to start the water in the shower are part of what I know I have to buy, but it comes in the same box with the rough-in materials (that aren't seen because they're behind the tub walls and between the studs).  I'd like to tell you this is a one-time oversight (forgetting to have the valves on hand right away), but I've done this on a few jobs and had to scramble so the plumber could stay on track.

There are a few reasons I do it this way, but basically it's just works out better and is more efficient for me to buy the units myself.  For example, I don't want to leave buying the toilet up to the plumber and then come into the bathroom at the end of the project and find some dinky little thing that looks cheap and wrong for my house. Also, I don't want to see some funky, Lady Gaga type fixtures either.  Maybe the plumber would mean well in his selections, but he doesn't know what look I'm after.  Besides, his time would be better spent focusing on the craft he's licensed for.  

And to take this method-behind-the-madness a little further, how would I expect my plumbing contractor to estimate how much the fixtures will cost if he doesn't know exactly what I want when he's quoting my job? I'll tell you what he's going to do.  He'll do what I'd do if I was him.  He'll error on the side of caution and price up the higher end options so he's covered.  If there's a $200 faucet, a $150 unit, and one for $99, he'd have to assume I might expect the $200 one.  In the end, maybe I'd choose the one in the middle and maybe he gives me a $50 credit on my final bill, but I doubt it.   If this same guesswork goes into all the plumbing needed to trim out, I could find myself wasting a lot of money because I had them buy my plumbing finishes for me.  I'd rather do it myself and in most cases, the plumber feels the same way.

Now I get that I can hand the plumber a spec sheet and he can fill it at his supply house, but without going into the mind-numbing details, I'll tell you how that goes in a nutshell:  I end up spending more time and money and I don't get exactly what I want.  That's why I don't bother with a plumbing list of specified items and I do it the way I'm saying.   It's more practical, it's easier, my money goes a lot further, and we're all good

Monday, July 9, 2012

Push Hard to Get Quotes

A common mistake people make when serving as their own General Contractor is to hire the first and only person they meet on any given trade.  Roofing, ceramic tile, or the septic tank installation; it doesn't matter...you have to push hard to get multiple quotes and resist the urge to take a short cut and move ahead with less than three.  

Let's use plumbing as an example.  The rehabber and Joe Plumber meet and tour the property.  They talk about the project, perhaps review some drawings or sketches together, and answer each others questions.  This leads to an estimate and the novice renovator has to make a decision.  First of all, they don't have to tell the plumber yes or no at this point.  However, what happens many times is that the inexperienced renovator jumps into an agreement too quickly. 

I know how this goes in the mind of the renovator or home-builder because I've been there hundreds of times.  The plumber seemed like a good guy that knows what he's doing and what he's talking about.  Maybe he came highly recommended and that adds to the impulse to give him the green light.  Renovating a house is a lot of work with a long list of things to get done.  The person making the decision is focused on crossing things off their massive to-do list and having a plumber on board (with a name, phone number, and agreement) would feel like a big step in the right direction.  Plus, it's easy to award the first plumber the job and rationalize later that his competition would have likely been in the same ballpark (price-wise).  This is totally wrong.  You shouldn't stop at one quote and settle for that because one estimate won't give you an accurate understanding of the value of the work.  It's tempting to move ahead with the first price from contractor #1, but it's a mistake even if your uncle (a retired plumber) told you how much the job should cost, you got a guesstimate from a helpful licensed GC you know, or you diligently researched the subject on the internet.  Those are all smart steps on your path to finding a plumber and signing him on, but you need to keep going.

Let's say the first plumber (that good guy who seems to know his stuff) offers to do the job for $4,150.  You keep at it and plumber number two hands in a quote for $3,300, a third company says they'll do it for 3,000, and a fourth man submits a $2,500 estimate.  Three bids is good, four is better, and five is great.  For the sake of this example, let's just say a fifth quote comes in at $3,250.  This let's us know that the plumbing work for this job is worth a little over three grand.  It's not uncommon for the bids to stack up this way, and I'll also point out that I don't always take the lowest price.  I'll look hard at all the proposals, but ultimately I want a trades-person who can perform.  

A construction budget can get out of hand quickly and awarding work without getting plenty of prices is oftentimes a big part of this.  Going with the first quote would have meant overspending by a thousand bucks.  If you do something similar on all the major trades you'll be hemorrhaging money unnecessarily and budget headaches make any project harder than it needs to be.  I understand that there will be rehabs and scopes when five prices is just not doable; rural areas off the beaten path make magic numbers four and five a real challenge, some scopes are specialized and you'll be thankful to just get two bids (i.e. stained glass window repair), and sometimes it won't make sense to beat the bushes for prices when the cost is minimal.  I get all this, but really try to get three numbers from qualified folks and if you're able to get four or five on the big ticket things (like demolition, framing, roofing, drywall, painting, plumbing, electrical, HVAC, etc.) then do it.

Finally, there's a second very important reason why you really must get more than one quote per trade.  You have to be ready with a Plan B.  What if you choose someone and they have an accident or some personal family issue?  Things happen and you've got to have an alternate in mind so you can keep moving forward if something unfortunate occurs.  This preparedness is just smart business.  Like it or not, the sheetrocker, painter, and electrician will sure see it like this (as business), so you need to be ready to see it this way too.

Don't be foolishly impulsive and don't get caught with your pants down.  Get those quotes.    

Friday, July 6, 2012

The Exterior Façade

The word façade is commonly associated with the front, street facing side of the building, but for this post it includes all sides on the exterior; the brick, the siding, and the pieces/parts that cover the structural framing that are visible when you’re outside looking at the house.  None of my homes have had stucco exteriors, but that would certainly fall into this category.

When I wrote about Step 19 (Closing Exterior Openings), I described the importance of being in a position to work the inside and outside simultaneously.  So, as I’m getting ready for the rough-in (before insulation and drywall) on the inside, I’m making progress outside on trim, siding, brick, fascia, soffitt work and any other exterior work that would need to be completed before the painting can start on the outside. 

There was a time when I really had to think about the sequencing of all the different scopes on a construction project.  Now, the order seems more natural and second nature to me.  There’s more than one way to skin a cat and multiple ways to renovate or build a home.  The exterior façade sequencing is like everything else written on BSAPE.  This is simply how I do it. 

Fascia comes after the roof is done and the soffitt work can be completed after that.  Exterior trim around doors, windows, and corners need to be completed before masonry or siding work.  However, with a brick home, the soffitt needs to be done after the masons have finished because it’s easier to tie soffitt into masonry rather than the other way around.  On a building with wood, fiber cement, or vinyl siding I prefer to have the soffitt completed before the siding because (opposite to brick) it's more practical to tie the siding into the established soffitt in lieu of hanging the siding after.  Porch/balcony handrails get installed last (unless they need to be completed sooner for safety reasons.) 

The Cottage - Back corner before
The Cottage - Back corner after.

Sunday, July 1, 2012

The Mystery Plant from the Duplex

Can Anyone Tell Me What Type of Plant This Is?

I appreciate trees, bushes, and flowers a little more with each passing year.  And, as much as I enjoy watching things grow taller and fuller, I'm also aware of the value these plants bring to my properties.  Whether I'm building a spec home on a vacant lot or renovating one of my Pig's Ears, I make a serious effort to leave trees stand when possible and I'm mindful of salvaging the living things in the ground much the same as I do with valuables inside the home or around the property.  

While I was renovating the Bungalow/Duplex, Lisa (one of my favorite realtors) stopped by to review my progress.  Lisa is clearly the E.F. Hutton of all of my projects because when she talks, I listen.  Over the years she has unleashed a solid list of valuable suggestions, so when she told me to save a plant in the front yard at The Duplex, without a second thought I made plans to dig it up and relocated it to our yard. 

I replanted it at the base of a magnolia tree we have and it blooms every summer about this time.  However, I don't know what it's called.  Neighbors have asked me, but all I can give for an answer is a shrug to go with my crooked smile.  

So if you know, tell me in the comment section below or send an e-mail.  (Link found with profile).    

The Duplex Before - The mystery plant is at the base of the corner fence post.
The Duplex During.  The fence and plant are gone.
The Duplex After

See also: