Showing posts with label before after pictures. Show all posts

Saturday, March 2, 2013

Thinking of Bob Vila

I had boyhood plans to buy and fix-up old houses even before I was a teenager.  I watched This Old House on Saturday Mornings for years even while I was living in a rented apartment.  And I've been a subscription holder to This Old House Magazine for almost a decade and a half.  When I finished The Fire House, I sent thisoldhouse.com some before/after pictures and they featured my first pig's ear on their web page for a few days.  However, the cool honor didn't end there because they also sent me a box of sweet TOH swag; a sweatshirt, a coffee mug, and a couple ball caps.  Maybe my fondness for using these gifts prompted folks to bring up Bob Vila's name while they toured my projects because there was a phase in my life when it seemed like I heard his name thrown out at me quite regularly.  My visitors would say things like, "I wonder what Bob Vila would think of what you've done here?" or "I think Bob Vila would really like how you've saved this old house."     

Vila was the host of This Old House before home renovating and extreme rehabbing shows were staples on networks like the DIY and HGTV.  There's a large chunk of our population that instantly think of Vila when the subject of home improvement comes up and if there was a Mount Rushmore of Home Renovation, I think it's safe to say that Bob's face would be up there.

We live outside of historic Charleston, South Carolina and our peninsula has plenty of amazing old houses.  Along with our vintage architecture, we have a long list of great places to eat.  Hyman's is a popular seafood place on Meeting Street, it's just a block from the old market, and it's at the top of our family's list when we're in that part of town with time to sit down for lunch.  Great food, amazing service, cool atmosphere... we love Hyman's. 

Hyman's celebrates all their famous guests; they have them sign a plate that gets mounted on a wall, they put their signed picture up somewhere in the restaurant, and they attach a small placard on the table to denote where each celebrity sat for their meal.  Last weekend, we were able to squeeze in a lunch at Hyman's and our party of four sat at the Bob Vila Table.  However, if you're a big fan of The Cosby Show or The Cheetah Girls, you might refer to it as the Raven-SymonĂ© Table.  Judge Wapner was the court official who made The People's Court famous and his miniature plack was also on our table for four.  And finally, to round out this visit, we were amused to discover that the colorful sex therapist Dr. Ruth Westheimer had also sat at our table when she ate at Hyman's. 

Can you imagine if this eclectic quartet had all sat at this table the same time?  That would be an interesting conversation.  

So when you have a chance to visit the Lowcountry of South Carolina, I'll encourage you to make time to enjoy some of our antebellum architecture and while you're here be ready to stand in line for a few minutes to eat at Hyman's (there's almost always a line). 

p.s. - try the fried flounder.  

Sunday, July 29, 2012

Renovation vs. New Construction

The question comes up frequently in various forms. Is it cheaper to: a) renovate or b) tear down and build from scratch?  The answers vary.  Sometimes an experienced builder flatly answers, "Yes. It's always cheaper to demo the old and put up something new."  Other times a construction veteran will simply explain that more information is needed to answer the question.  Then there are other more complicated responses that identify geography, weather, the economy, and a list of other factors that impact a building project.  Bringing down a dilapidated home may be the way to go, but not always.

When the television program Extreme Makeover Home Edition started airing in 2003, I made sure to catch the first few episodes because what I do is sometimes described as 'extreme home renovating.'  If I remember accurately, the initial houses were not tear-downs.  They were major rehab efforts and total gut-jobs, but Ty Pennington and the gang worked with the original bones of the family house, redid it, and made improvements.   I like that concept.  Salvaging what's worth keeping, getting rid of things that need replacing, and making a house better than it was.  However, somewhere in the shows early history they started taking the house down to the ground, hauling everything away, and starting over.  I loved the whole idea of the EMHE team giving a special family a fresh start and all, but to be honest I was most interested in the construction stuff and the before/after transformations.  Demoing the old and rebuilding new?  That's not the way I do things, and after the first season I tuned out more than I tuned in. 

Last week, I priced up a small project in Charleston, South Carolina.  Although this prospective renovation was within one of the historic districts, it was only 36 years old.  When estimating for a renovation, you have to be ready for unexpected costs that may be hidden.   In this project, I had to prepare my friends looking at the property for all the unexpected expenses.  This makes the cost number higher now than it might actually be down the road when everything is said and done, but I think this is the best approach.  I could have given them an overly optimistic estimate and then explain later why things cost more, but that's an unnecessarily bumpy path to take.  This reality is at the heart of cost comparisons regarding rehab and building totally new.  In general, a renovation is more challenging, more work, and less predictable.  Easier translates to cheaper.  That's why new construction gets the green light so frequently. 

In my view, newer is not necessarily better.  Look at the City of Charleston again as an example.  The Holy City has not just accepted it's old buildings, it protects and treasures them.  The Board of Architectural Review (BAR) has jurisdiction over all the city's buildings and requires a review of work on any buildings over 75 years old.  This is not a control issue.  This is a money issue.  Tourists flock to our city because of it's history and all the old preserved buildings that help tell the stories of the past.  So if you think about it this way, it costs money to save old buildings, but it can pay dividends that make it worth the effort.  As a side note, Charleston does allow new construction, but they are involved in the process from the start and the new buildings often look like others that have stood for hundreds of years. 

Too frequently, I see great old buildings getting torn down and hauled to a dump site.  Then something new goes up that's shiny and modern, but a building that's not necessarily an improvement over what had been sent to the landfill.  At times, I learn later that the contractor convinced the decision makers that tearing down was the best way to go.  I agree, it was the best way to go for the builder, but I won't say it's always been best for everyone else.  The people and the community may save some money in the short run, but over time, when all the area's old buildings start disappearing, a warm community starts to evolve into a something less charming, somewhere people don't want to live, work, and do business. 

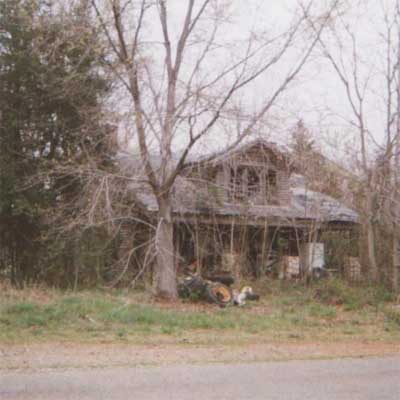
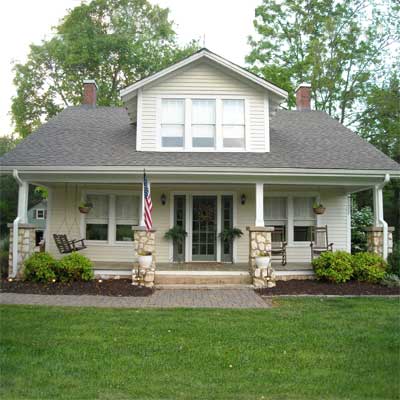
And finally, I'll end my rant with a really great example of why sometimes, renovating an old home is the way to go.  I'm linking up with thisoldhouse.com for the pics because the before/afters do a lot to help share this story.  A young woman (Tara C.) and her husband decided to save a home in rough shape that was located on family land.  Her grandfather and great-grandfather had built the home and the young couple and her father worked together to renovate it.  This is better (not easier) than tearing down and building new for so many reasons, but the one I think of most clearly is that someday, this couple will hopefully have a family of their own and Tara can tell her child (or children) that four generations of men in their family (and Tara herself) worked on that great house. 

The Tara C. Family Home - Before
After
Look at that after pic above.  That's the same house!  Results like these (and the stories/history that come along for the ride) are why... in the battle of Renovating vs. Demolishing and Building New, I'm cheering for the rehab effort more than it's rival most of the time.   

Sunday, July 1, 2012

The Mystery Plant from the Duplex

Can Anyone Tell Me What Type of Plant This Is?

I appreciate trees, bushes, and flowers a little more with each passing year.  And, as much as I enjoy watching things grow taller and fuller, I'm also aware of the value these plants bring to my properties.  Whether I'm building a spec home on a vacant lot or renovating one of my Pig's Ears, I make a serious effort to leave trees stand when possible and I'm mindful of salvaging the living things in the ground much the same as I do with valuables inside the home or around the property.  

While I was renovating the Bungalow/Duplex, Lisa (one of my favorite realtors) stopped by to review my progress.  Lisa is clearly the E.F. Hutton of all of my projects because when she talks, I listen.  Over the years she has unleashed a solid list of valuable suggestions, so when she told me to save a plant in the front yard at The Duplex, without a second thought I made plans to dig it up and relocated it to our yard. 

I replanted it at the base of a magnolia tree we have and it blooms every summer about this time.  However, I don't know what it's called.  Neighbors have asked me, but all I can give for an answer is a shrug to go with my crooked smile.  

So if you know, tell me in the comment section below or send an e-mail.  (Link found with profile).    

The Duplex Before - The mystery plant is at the base of the corner fence post.
The Duplex During.  The fence and plant are gone.
The Duplex After

See also:


Saturday, May 26, 2012

Step 16 - Evaluating the Base, Bones, & Roof

If I'm breaking down what I do and how I do it, the thirteenth step would address the trio of foundation, supporting structure, and the roof. (In no fixed order).  The foundation forms the base of any structure and it's construction is usually the first major component of a new building.  After this groundwork is in place, the structural framing usually goes up next, and then the roof is added up top.  However, there are exceptions to this.  For example, with many pole buildings, the framing is first, the roofing is second, and the concrete/foundation is after (and may even get placed following the installation of the siding, doors, windows and plumbing rough-in).  Think of extreme home renovating as another exception to the norm and remember that you don't necessarily have to tackle it in the order of: foundation first, framing second, and roof third.

The Fire House - Framing/roof came first.
For me the sequencing of these three has varied.  On The Fire House, I focused on the framing, then did the roof, and had no issues with the block or concrete work supporting the home.  The Hurricane House was the same; no foundation issues there either.

On The Cottage, the roof didn't leak and the shingles were in good shape.  So I started with the foundation work on this property before heading inside to move walls and redesign the interior.  On this project I didn't need to add a new roof until I was ready to sell a few years later.

The Bungalow was an example of a project that started with the roof.  When it rained, water came in everywhere.  There were buckets and large plastic containers under the leaks and for the first months of the project these had to be watched and dumped regularly.  On The Detached Garage at the Bungalow (which was a pole building), the slab and the original nine poles were fine, but everything else had to be redone.

The Duplex - The roof was the hot issue due to tenants
On The Duplex, the roof was the hot issue right away as well and was even more significant because I wanted and needed to keep the tenants dry.  (Leaks in the units would lead to unhappy tenants/vacant apartments and I needed that monthly rent to make this project work financially.)  

The Detached Garage at The Fire House was like two different projects that was taken on two distinct ways.  When I bought the property it was half storage and half carport.  The roof had no issues, so I closed in the open areas and then placed concrete after that to make it a two car garage.  However, after the oak tree next to it got struck by lightening and it burned down, I had to rebuild it from what was remaining, which was the concrete slab.

So, understand that every project is different, especially when the home has been condemned or forgotten.  There's no one way to bring it back to life, but you need to be ready to deal with the foundation, the structural framing, and the roof right away. 


The Duplex After - Same view as above
The Fire House After - Same view as above.

The Bungalow - Before.
The Bungalow - After
The Hurricane House - Before
The Hurr. House - After  (Slightly diff. angle)
The Det. Gar. at The Fire House was originally a carport.
The Det. Gar. at TFH after it burned down.
The Rebuilt DG at TFH that started w/ the slab that survived the fire.


Saturday, May 5, 2012

NC's Bathroom Redux on Rehab Addict

I've taken some of my own advice, kept an eye on the television schedule, and caught some more Rehab Addict on DIY.  I was able to see the Bathroom Redux episode this week and as I said before it's all really good stuff.  Nicole Curtis, the shows host, was working on her Harriet House which is an 1890 home that's now upper and lower apartments.  Along with a list of other demolition and renovation tasks, Curtis and her team demoed some walls to expose the interior so they can bring plumbing and electrical up to code, blew insulation within the cavities behind the laths on the perimeter walls, and trimmed out around a radiator (with a removable top).      

Nicole knows the value of the before/after pictures and video (see Step 1 - Pictures, Pictures, Pictures!) so we all get those looks of what they started with.  The bathroom at the beginning of the episode was jacked-up.  If you lived there and had to use the before bathroom, you'd really question the need of bathing everyday or you might buy a membership at the nearest YMCA and shower over there.  It wasn't the worst bathroom in history, but there may have been a few science experiments growing in there.  It was not good.

After they demoed the trim and framing funkiness around the claw foot tub (that was kind of wedged into a hard to use corner/nook type area), Curtis got to work.  She prepped and refinished the claws and underside of the tub, the tile team installed the chosen basket-weave pattern on the bathroom floor, and then the tile crew knocked out the subway tiles on the walls.

Afterwards, it was completely different...like a spa or some great bathroom you'd find in a Bed and Breakfast somewhere.  It was spot-on and it made you want to shut the door, fill the tub, and have a good soak after a long day.

I almost forgot to mention the exposed brick they discovered and revealed.  I missed how this turned out, but I will see it down the road because I'm watching the schedules even closer and looking forward to seeing how the Harriet House Duplex ends up when Nicole and her team are finished.

Rehab Addict Nicole Curtis on DIY  April 24, 2012

Nicole Curtis Going Non-Conventional on Rehab Addict  May 10, 2012

Friday, March 16, 2012

Weeping Mortar Joints

Tools needed to remove WMJs.  (Brick Hammer is shown,
but any hammer to pop down on your chisel will do.)
From my end, it's clear that there is a lot of interest in the topic of Weeping Mortar Joints.  There are some that hold WMJs in favorable regard and believe they should be appreciated as an architectural element.  As I've mentioned before (see The Weeping Joints at The Fire House) when complemented effectively, I'm totally sold on how they can contribute to the exterior facade.  However, when they've been painted with the exterior brick, I think the result is less-than-impressive.  When I had weeping joints on the project we call The Fire House (before), most of my visitors believed strongly that I had no choice but to deal with them in some way.  I agreed.  

There is more than one way to skin a cat.  I've found that if you have a unique issue it's possible to get five different suggested solutions from five people.  They all may be right and they may not.  When you're the one making the decision it's up to you to listen, sort through what you've been told, and draw on your own knowledge base to move forward as you choose.  The WMJs at The Fire House (during) was an example of something that inspired a diverse variety of advice. One person strongly recommended that I hire a masonry crew to chisel away the oozing joints, grind out the mortar, and then tuckpoint replacement material back in to create more traditional looking joints.  Another visitor recommended that I find someone with a jackhammer and get out of the way.  A few thought I should simply get used to how the home looked because they knew of no viable options for me.  And another man got more specific and unloaded his seemingly costly and time-consuming advice for me to attach wire fabric to the brick and then apply stucco.  As I mentioned in my February post on this topic, it was pretty simple and I just chipped the WMJs all off myself by hand, a remedy that eluded the curious folks stopping by.

Question:  How do you eat an elephant?
Answer:  One bite at a time.
 
Front Before Removing WMJs.

After
I didn't try to chip all the weeping joints off in one day or even a weekend.  The exterior walls were between nine and ten feet high.  I broke that height in half and started moving my way around the house a day at a time and one 5' x 5' section at a time.  Some evenings I chipped away after work for 20 or 30 minutes and there was a day or two on the weekends when I did twenty-five square feet in the morning and the same sized section before dark.  It was not difficult or strenuous and there was an immediate pay-off because of how the work impacted the exterior look so profoundly.  Once the WMJs were gone, the joints then had a jagged look that differed from typical/traditional ones finished during construction with a jointer, but they looked good.  Better stated, within the painted brick exterior of The Fire House (after), they looked right and if a visitor didn't know any different, they likely assumed that the way it appeared was the way the brick facade had always been.
 
The back of The Fire House just before I removed the WMJs.  You can chip away from a ladder, but I built a box frame to use as a scaffold that I slid along and worked from as I progressed around the perimeter.  I also used this scaffolding to work from as I repaired the fascia and soffit. 

After


Sunday, January 29, 2012

Step 3: Take Pictures and Get Video

Before you pick up a piece of litter or a rotting tree branch in the front yard, take a few minutes to get pictures and some video.

When I started renovating, I had an old timey camera that I’d brought with me from the 1900s, one of those relics that kept me from having a look at my photos until I’d picked them up from the pharmacy photo center.

Today, it’s easy to get good shots from multiple angles and record some video with your phone, plus you can confirm that you have images and film worth saving right away. The value of photos and a little video may not be totally clear yet, but I guarantee you'll be glad you squeezed in a few moments for this step.

All of the sellers have allowed me to walk the site with my camera, getting the exterior pics and video before we sat down to sign all the papers. In fact, doing Step 3 as soon as possible after we have our signed agreement has always felt like just another way of letting the owners know I’m committed to buying their manky house.

I'll admit that my strategy of doing this step early has a potential down side, a pitfall I fell into once. After taking the outside pictures and film prior to becoming the legal owner, I forgot to go back and do the inside later, before I got to work on the interior. In my defense, the occupants were renters for a while, and I didn’t want to disturb them. However, the big point is, I don’t have the room by room, inside, before pictures of this project. 

After you start making progress, you’ll naturally begin to forget what you bought. In addition, even if you’re family and friends aren’t from Missouri, but somewhere close by, you’ll still want to be able to show them what you started with during your rehab and after you’re finished.


However, more important than proof for others is the reality that you’ll need the pictures and video for yourself. Anything eating up your time, requiring so much effort and attention, will have moments when you pause to ask yourself what you're really doing and why you're doing it. These pictures will serve as a small payoff in the middle of your adventure, when you’re tried, sore, and dirty. They’ll help you to regain your focus, reminding you of how far you've already come. 


Many times, I have heard home renovators share with some remorse that they forgot to take pictures before they started. Learn for them, and heed my advice. Invest a few minutes for this step. Click away and push that button to record. Delete diligently as needed and come up with a system of organizing these recordings throughout the project so you won't have to be overly concerned about taking too many. I promise, you'll be glad you took plenty of pictures and at least a little video.


Before - With the gray color, the smoke stain
from the fire, and the dark blue trim (that
looks almost black) this house was dark.  However, it
still conveys plenty about what I started with.

During - It's plain to see that progress had been made,
but clearly, still had a ways to do.

After - People will see how things look when
you're done, but with the final pictures you'll
be able to show them in the future if/when you
move, or thousands of miles away as they review
your achievement online.