Showing posts with label caulking. Show all posts

Monday, November 11, 2013

Step 30 - Wall and Ceiling Finishes

Caulking and painting on the inside follows Step 29 - Interior Trim.  My budget and schedule determines weather I do this scope myself or if I sub it out.  No two jobs are alike for me in any way and Step 30 is the same...sometimes I paint a little and sometimes a lot.

After years working with experienced painters I've learned enough that I can fake it as a painter when necessary.  I can save you a lot of time by passing on what I've learned pretty quickly and you can use these tips as a good starting point if you're new to home renovating.
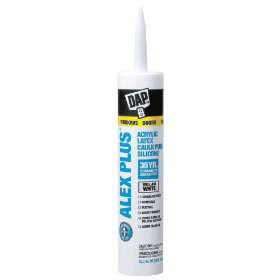
DAP ALEX PLUS
Acrylic Latex Caulk Plus Silicone
White 10.1oz. cartridge

Caulking - Less Is More
Caulk makes the paint job look perfect.  I'm not a master carpenter, but caulk can make me look much more skilled than I actually am.  That's just the way it is.  I always use the DAP Alex Plus shown on the right.  I keep a wet rag hanging over my shoulder as I go and I just do small amounts (not more than 20 ounces) at a time.  You have to be ready to get a little messy when you caulk.  You're going to need to use your finger to push the caulk into the joints and smooth things out before it dries.  The caulk will dry fast enough that you need to keep falling back so it doesn't start to set before you have a chance to neaten it up.

As a rule, I juggle the caulking and painting in Step 30 so I'm working an area I caulked earlier (and preferably the day before) so it's totally dry when I hit the area with the paint. 

Zinsser Bulls Eye 1-2-3
Primer - Sealer - Stain Killer
Painting - Keep it Simple
I've tried sprayers, rollers, and countless gadgets to help me paint, but I've grown to not make it harder than it needs to be.  I use only a few different sized brushes, painter's tape, and a standard sized roller.  I prefer Zinsser 1-2-3 for primer and for a lot of my white trim.  Like the Alex Caulk, the Z123 is Interior/Exterior and water based...so it's practical.  You may find or have something else you prefer, but if you're looking for a starting point for painting raw wood white, grab up a gallon of the paint shown to the left and get to work.  For me, it's the stuff. 

I always keep the interior wall colors simple - nothing too bright or exotic.  This creates the look I'm after and I find it to be more practical than lots of colors.  With white trim, I like to do a soft beige on the walls and I'm in the habit of using ceiling paint for the closets, pantry, and laundry room. Painters charge more when you use an array of colors and I get why because it adds time and cost in the form of wasted paint. 

Also, as far as paint finish, I use satin.  Eggshell shows marks too easily and glossy is hard to touch up in small sections.  As far as paint manufacturers go, I use Sherman Williams more than anything else.   I have an account there and they give me a little discount, but they have locations all over plus they have a great product and service that I've found, matches their reputation.     

Finally, a paint contractor stressed to me how important clean up is early on in my career.  This advice has served me well.  So in Step 30, I'm in the habit of rinsing out the caulking rag frequently and cleaning my paint brushes and roller tray right after I'm done.  Just get into a groove of keeping your paint gear clean and this will save you a lot of time and money over the course of your rehab.

Monday, July 23, 2012

Step 18 - Exterior Caulking and Painting

The Fire House - Just before be painted.
A great time to dig into the exterior is while the plumbing, electrical, and heating/air conditioning crews are busy with rough-in on the interior.  Clearly, the painting of the exterior is closely tied to Step 16 - The Exterior Façade.  However, if the home has been buttoned up with maintenance-free materials, the exterior caulking/painting may be minimal.  As I've written previously, all of my properties have been different inside and out so the scope of exterior painting and caulking has never been the same either.  For example,  The Fire House got painted from top to bottom; the exterior walls (with their weeping joints removed), the soffitt, the fascia, the front porch posts, and porch ceiling...all of those areas were brightened up with paint.  The Bungalow was fiber-cement sided and comparable in terms of painting on the outside, but on this one the soffitt was vented vinyl.  The Hurricane House was brick, but with maint.-free metal fascia and vinyl soffitt.  The front door and matching wooden shutters were painted on the outside of this home, as well as the trim around the windows, but that was it. 

Paint makes a big impact.
Caulking serves more than one purpose, but it's main job is to seal up small gaps.  It helps keep water and small critters from finding a way inside the house.  However, caulk can also make an average carpenter look good and great carpentry work look perfect.  I never really understood the impact of caulking until I worked on a prison where everything had to pass what we called 'the razor blade test' - if an inmate could slip a razor blade into any gap or crevice, we had to have it caulked with 'security caulk.'  On this big project we hired a caulking subcontractor.  The company sent us a three man crew that did nothing but caulk eight hours a day for weeks.  It was a lot of tedious (and sticky) work, but it was necessary and it made a big difference in how secure things were when we were finished.  In addition to that it helped make everything look clean and tight visually.  This project really drove home for me how caulking can give a painting job the finished look that oftentimes makes a professional's paint work look so much better and more complete than an amateur's.  So, don't forget about caulking before you paint.

A decade ago, I didn't really enjoy painting.  However, I can't say that now and periodically I like getting lost for a few days in a large painting task.  There are two things I've learned that make painting more enjoyable for me.  First, you have to keep your brushes clean.  Secondly, you have to take the time to prep properly (which includes caulking before-hand and allowing adequate drying time).  These two things make a huge difference and understanding the importance of them makes painting more fun and productive.

It took this painter three years to finish the siding and exterior trim on The Bungalow, but she wrapped things up just in time to start kindergarten.  Use big paint brushes for large areas & smaller brushes for trim.  Don't break out the watercolor brushes unless you're painting intricate details on a Victorian or ... teaching a toddler how to paint.